Search This Blog

Monday, December 6, 2010

Using an Existing Note (Dr. Barker)

Even better than using a PreCompleted note is re-using a prior note on this patient as the basis for the current note.  All the diagnosis stuff at the bottom is already there and frequently PE just needs updating. 

The second tab when you Add a note is “Existing”, click and you will see prior PowerNotes on this patient.  Using the check boxes you can filter the list when it gets long by looking only at your notes.   Generally you want to have “All encounters” checked for outpatients, “Current encounter” might make sense for inpatients. 


  Pick the note you want to use and then click OK.


  When you import a note this way it frequently comes into view in the “Display Note View”.  To change it so you can work on it click on the button in the upper right that says “Template View."


Couple of things to be mindful of – it has a tendency to include the vital signs of the original note and the current visit.  Click on and then “clear” the old ones if you want.   You may need to update the medication list – and sometimes it imports things like meds, allergies, and dx twice (old note and new AutoPopulate) doubleclick or right click and clear to get rid of older one. 

 You will need to add any new diagnoses and delete any you are not addressing at this visit in the diagnosis and management section.  Also remember to clear any physical, lab, or consult info that is not longer relevant.  But for many routine outpatient visits, and probably many inpatient days the last note might be a good place to start from for today’s note.   

Thursday, December 2, 2010

Pre-Completed Note (Dr. Barker)


PowerNotes allow you to take a PowerNote and use it as a template for your typical patient visits.  So lets say I want to have an outpatient note for seeing patients with osteomyelitis in I.D. Clinic.

I start off by changing Type to Infectious Diseases Outpt, I want to see if there is a note type that can be useful so using the encounter pathway I type “osteo” and I find out there is a pediatric osteomyelitis note. 


I can go through this entire note filling in all the bits that are likely to be correct – like most of these come to clinic from nursing homes where they are getting IV antibiotics (using my AutoText).


Once I have it completed it I go up to the “Documentation” tab at the top – click on it and then select “Save As Precompleted Note” 


Next screen asks me to name it – lets call it “Osteo in I.D. Clinic”  And click on the “save as new” button. 


These new “Precompleted Notes” are accessible under your tab of the same name when you go to add a note. 


So what does this get you – you could create a whole bunch of personalized templates where large sections of the note can be completed ahead of time.  For example most of us do the same elements of physical exam for each asymptomatic outpatient we see you can check off all the physical exam elements as normal and then just alter any you find are abnormal.  Typical visit is one such note for me – this is the PE section.  Anything I skip I just uncheck, anything abnormal I just change – but all the normals are all ready checked off. 


You can do the same thing for lots of different common conditions, and procedure notes.  This can be a big time saver – just remember not to use it to document things you did not do. 

So if you are making a Precompleted note you want it to be somewhat generic, but specific for your exam, your patient education, etc. 

Auto Text (Dr. Barker)


We have lots of templates built up in Cerner clinical notes, but getting them modified is time consuming and rarely anyone’s top priority.  Using AutoText you can make modifications to templates and you can make them more useful.

This time lets start off in the clinical documents – the old way we have been doing documents.  By the way if you are nervous, there are quite a number of bogus patients named Test, Test etc. that you can work on and not harm. 


Open up a new note, and import your favorite template as you usually do.
Mine is the template for recording HIV resistance tests.


Now, lets fix a few things, take out the empty space at the top, fix the misspellings, add a couple colleagues names at the bottom, etc.  Just bring it up to date. 

Next step is to use a Cerner trick – there are a whole bunch of places in this form where we need to enter information but this is just plain text as far as Cerner is concerned.  We can tell the Cerner System where those places are by using the UNDERSCORE character.  To insert an underscore you place your cursor where you want and while holding the SHIFT key down you hit the key just left of the + and = sign key, this inserts an underscore.  Cerner understands that an Underscore is where you want to enter data.   So the best practice is to go to each place in a form and leaving one blank space after the : place a ­_ symbol.

So my form now looks like this.


Cerner uses the F3 key at the top left of the keyboard as a TAB key to move between underscores in a document.   Hitting the F3 moves you right to the next underscore. 

So how does this tie into AutoText – simple; remember the thing about placing the cursor in front of text and holding down the left mouse key – and dragging it through the whole text you want to use?  Do it now and highlight the whole modified template.   Whole thing should be highlighted in black. 


Now right click the text and pick Save As Auto Text. 


Follow the same steps and create an Auto Text , name it “zzSomething” , click Create, click Close.

Now the next time you need the template, instead of using the old template through the “rubber stamp” icon you can use your updated AutoText.  Just start a new document and either type “zz” or right click the blank field and click insert Auto Text and pick the one you want and click it. 


As a result you get your newly updated, personalized template with the nifty F3 accessible info entry places. 


Other very handy uses for the Underscore might be places where you want
Yes ­_  No _  N/A _  and such answers.   Just keep in mind that this is just text and in the final note you would see it as.  

Yes _  No  X   N/A _ 

This is not as good as a true PowerNote because the info is just text and cannot be searched the way the <elements> in the Sentences of a PowerNote can be.  However a really good template can make your work go faster and allows you to develop something that can later be translated into a PowerNote by an HIS analyst.   Plus you can invoke a template built as an Auto Text in a Clinical Document or a PowerNote very easily.   Your AutoTexts are available to you in both types of documents, so you can develop it in one and use it in both types.

PowerNote Conversion

  • A final reminder to all providers to schedule a training this week if you have not yet accomplished this! Information about available sessions is on the Intranet.
  •  There will be Cerner “ace support” staff located in the hospital, many of the outlying clinics, Fantus and each module in SCC every day next week.  Please take advantage of their presence to answer your questions.
  •  A 24 hour hotline will be available to troubleshoot starting tomorrow 12/1.  The number is 864-DOCS (3627).
  •  A powernote support center will open tomorrow in room 700 in the Administration building.  It will be open from 7am to 5 pm Wednesday and Thursday and 12 to 4 this Friday.  This will also be open over the next couple weeks with the schedule to be announced.   This is available to any provider seeking support in the creation of their pre-completed notes, macros etc.
  •  The following is a link to another convenient resource the youtube videos created by Dr. Bala Hota reviewing the use of the powernote.  http://www.youtube.com/user/balahota1?feature=mhsn#g/a

Tuesday, November 30, 2010

Auto Text (Dr. Barker)

Auto Text is much more flexible and useful than Macros.  First of all you can use an Auto Text in any Note type.  Secondly you can use an Auto Text in any place in any Note.   In this tip you will learn how to create and insert Auto Text.  In the next one you will learn how to turn one of our current templates into an Auto Text.

So lets say that I see a number of patients from nursing homes in my clinic and I want to be able to use the phrase “nursing home staff” in places like the “Accompanied by” sentence or the “History limitation sentence”.   If I made a Macro it would be tied to that sentence – if I make an AutoText I can use it anywhere.

So I start by opening the OTHER text box in “Accompanied by”, but this time after typing “nursing home staff member” I right click the text box and one of the choices is “Save as AutoText” I click that choice. 


This box will open and I need to give it a name – I’ll call it qqNHstaff for reasons that will become apparent.   You can give it a description as well if you want.   Click the Create button and then the Close button.


One important thing about naming these – you want to use at least a pair of characters that never appear together at the beginning of a word or sentence.  Small case zz or qq are good choices, but you can use others like symbol characters.  The reason is that if you create an AutoText with a usable abbreviation, every time you start to type that word it will ask if you want to insert the AutoText that starts with those symbols.  Say for example you created an AutoText and named it “Thebomb”  every time you type “Th” the insert AutoText window will pop-up; which will get very old, very quick.   So – at least as a starting place use AutoText names that start with “zz” or “qq”. 

Having created this new AutoText (notice after hitting create it appeared in my list of AutoTexts).  I can reuse this anywhere I want – like in the “History limitation section”.  If I click the OTHER in that section – the dialog box opens to freetext but now I type “qqN” and it offers my new AutoText in the Pop-up within the box.  I click on it and it inserts the text. 


Mouse click the name of the AutoText (you can also hit the down arrow key until you highlight the one you want) and it will be inserted and click OK, 


This may not seem like a big advantage for a short piece of text but one of the differences is that there is no size limit on AutoTexts.  And more importantly you don’t have to use an OTHER box to insert one.  

The blank spaces that appear at the end of each paragraph can be clicked on and you can just type there if you want.  The text that you type will appear under the paragraph name in the final note rather than any single sentence.  So for example I could go to “Interval histories” and click on the white space after the paragraph and just type what ever I want – in this case I collapsed the paragraph by clicking <hide structure> just to get it out of my way. 


Even better is the fact that I can insert AutoTexts in these white spaces without bothering to use the OTHER boxes in the sentences.  In this case I am inserting an AutoText that I use to document counseling a patient about adherence.   This AutoText’s name starts with “zz”. Note that you never have type the whole name (or even remember the whole name of the AutoText) just enough to cause the window to Pop-up. 


I highlight my choice and click on it and it inserts the text of the whole AutoText.  Keep in mind that the names are case sensitive so zzadherence and zzAdherence can be different and appear at different places in your AutoText list. 


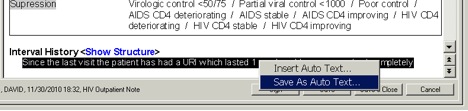
Last thing for this tip – text typed in the white spaces after a paragraph can be used to create an Autotext.    Left click your mouse either before or after the text you want to use to create an AutoText and holding down the left button drag it across all the text you want to include – it will become highlighted in black.  Then right click the highlighted phrase and select “Save As Auto Text”.  Go through the same steps – name it – click create – then click close and you will have another AutoText. 


Try not to get carried away with making too many of these or you will end up having to scroll through long lists of them to find the one you want. 


Making Macros (Dr. Barker)

In basic computer speak a Macro is a series of steps that are done together, and the series is identified by a title or a short-cut command.   In Cerner PowerNotes you can create blocks of text that you use frequently and store that as a Macro.

So lets say that I see a lot of new patients referred from the STD Clinic and I want to be able to document that referral source.  I go to the “Referral Source Section” and click on “Other”


When the text box opens up I type my text… “CORE STD Clinic” and click OK


The text is inserted in this note, but what if I know I need to be able to use it in future notes on other patients. 


Place your pointer over the text you want to be able to reuse- and click the right mouse button.  A pop-up menu appears and you can choose “Save Macro As”


Left clicking “Save Macro As” should get you here. 


You should rename this Macro, names that are highlighted in Dark Blue the way OTHER is here are set to be replaced when you type – I am going to call mine “CORE STD” – so I just type that as a name.   Then click the “Create New” button at the lower left. 


You should now have a new Macro denoted by the blue M.  You will notice that the “OTHER” free text section reappeared to the right after I used it to type in the CORE STD Clinic text – this is so that I could make additional free text entries if I needed to – because my Macro is associated with the OTHER item the Macro M appears there as well. 


What if I have alternative referral sources I want to be able to document?  There is no limit to the number of Macros that can co-exist in one item.  So I can make as many additional one as I need.   Here I am making one that says “CCH Emergency Room” – the M you see is the CORE STD Clinic Macro. 


If I create multiple Macros in the same item only one M appears but when I click on the M I get a list of the possible Macro choices – just click on the one you want. 


Multiple choice Macros seem to get alphabetized by title – so if you have a particular favorite you might want to call “aaWhatever” so it is at the top of the list.    Macros can be much longer than these simple ones – they can be whole paragraphs.   

The downside of Macros – they are very specific.  They are tied to that element, in that paragraph, of that Note Type.   So a Note type could have hundreds of Macros associated with specific elements but they generally will not show up in any other Note. They are useful because they can free us from having to do repetitive documentation. 

When is it worth creating a Macro – when there is something you need to document repeatedly at a specific point and there is one, or just a handful of choices.   Unusual occurrences that will not happen again aren’t worth it.  

For something more widely useful we need to talk about AutoText – next time. 


Sunday, November 28, 2010

RX Writer (Dr. Stabile)

Power Chart/Rx-wrtier tip:
 
Everyone may have figured this out already, but in Power Chart you can print a "patient friendly" version of the medication list just like in PCO.  You selected "task", then "reports" and check "medication list".  That prints up the list in an understandable way for patients.

Supercharging AutoText in Cerner PowerNotes.

4: Building macros in powernotes (Dr. Hota)

3: powernotes, navigating the powernote (Dr. Hota)

2: powernotes: loading templates and prepopulation (Dr. Hota)

1: Power Notes: Introduction, and document viewing (Dr. Hota)

5: Creating Precompleted Notes in Cerner PowerNotes (Dr. Hota)

8: How to create basic templates in PowerNote (Dr. Hota)

7: How to use autotext in Cerner PowerNote (Dr. Hota)

6: How to enter free text into the PowerNote (Dr. Hota)

FONT SIZE

To make the font larger in PowerNotes there are two useful tricks – (courtesy of Dr. David Barker): Go to view at the top of the screen, click to open and click on “Zoom in”:

Go to view at the top of the screen, click to open and click on “Zoom in”  you can repeat zooming in as many times as you need for your level of vision.

This is what you get after 4 cycles of zooming in.

FULL SCREEN MODE

2nd useful trick – full screen mode – look for the button next to the “Add” button (courtesy of Dr. David Barker): 
Pressing this button enlarges the working note to fill the screen.  To return to the previous view just press the restore button in the upper right corner.