Search This Blog

Wednesday, December 8, 2010

Canonical Sentences (Dr. Barker)

Another way to add items to a note is to insert options to specific paragraphs.  PowerNotes are divided up into “Paragraphs” and “Sentences”.  The Paragraphs such as “Visit Information”, “Chief Complaint”, and “History of the Present Illness”.  Paragraphs are separated by a clear space (that you can free text into).  Within each paragraph are a number of “sentences” separated by horizontal lines.  Below is the paragraph Visit Information and its five component sentences:


If you click on a paragraph’s name – an icon in the upper left appears.  You can also get this icon by clicking on a paragraph name in the light blue navigation pane on the left side.  Click the icon.


Close up of this icon:  


I am in the Physical Examination Paragraph, if you click it this “Insert Sentence” popup opens: 


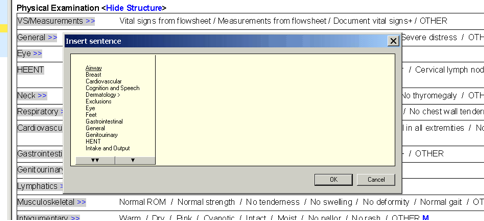
These are sort of “developers tools” that were not used to build a particular note, but are available if you want to insert them.  They are called “Canonical Sentences”. Let’s choose the one that says “Feet” and click it – it will highlight in red and a check mark will appear.  Then click the single arrow at the bottom of the box (this is a scroll down one line).  Click the “Lines and Tubes” line it will highlight in red and a check mark will appear – the check by “Feet” will remain.  Now click OK.  The double arrows scrolls the choices by one whole page ~12 choices.  


Now what you have is the original Physical Examination Section with the two extra sentences “Lines and Tubes” near the top and “Feet” added near the bottom.


If we click on the chevrons to expand the Feet sentence content you get this which would allow you to document a lot of foot findings


Keep in mind that each paragraph has its own menu of canonical sentences – eventually you will get familiar with what is available.  Here for example is the second page of choices under the “Review and Management” paragraph.  When a canonical sentence has a chevron (right pointing arrowhead) as “Sleep studies” does here it means it has sub-sentences available.


You can, if you want insert more than one of these into the note. 


At this point you may be saying that this is an impossible amount of stuff to try to remember.  The logical thing to do is explore this as a tool – pick out the things that may be useful to you in your role and insert them and save it as a pre-completed note.  In this example if your work included reading sleep studies you would insert these sentences and then save the expanded template as a Pre-completed Note called maybe “Sleep studies”. 

These are just tools available to you.   You don’t have to use them.  But the best and swiftest craftsmen make the best use of the available tools.  

Dealing with Resident Notes- Comment Dr. Judy Neafsey


Jay, Thanks for the description for resident supervision.  I will pass it on to a few people and I agree if others find a better way--let everyone know.  My only question and I will also try tomorrow when I am in clinic--I didn't know you could strike through parts of the resident note already signed.   I thought you could only add the addendum.  Have you done it?  Also, if you just go to the patient chart in your list and open it I believe you can add the addendum even if they don't "endorse" it to you. This may mean more searching on the attending's part by sticker or patient list but still an option if not endorsed.   If this works well I would share it with all the teaching clinics and the specialists. It is possible to save an autotext of a couple different general attestations as well to put in the addendum. Judy

Dealing with Resident Notes (Dr. Jay H. Mayefsky)


Once a resident signs a note, it cannot be edited any longer (i.e. fields clicked on or text entered into the text of the note). All you can do is modify the note. This allows you to free type an addendum at the end of the note and to strike through parts of the resident note you want deleted.
 So this is the way I recommend to deal with residents:
1.       After the resident finishes seeing the patient, before he presents, he needs to “save and close” his note.
2.       The resident then comes to the attending to present.
3.       The resident should log on to PowerChart at the attending’s terminal (as well as the terminal in his exam room). The reason for this is so that the note may be edited if necessary and/or signed by the resident at the time of the presentation. If the note is opened in the attending’s version of PowerChart, the attending will become the author of the note and the resident’s name will be deleted.
4.       When the attending agrees that the note is complete the resident can sign the note. Upon signing, the resident in prompted for an “endorser”. He should type in or select the name of the attending to whom he presented. The note is then automatically sent to the attending’s “inbox” in PowerChart.
5.       The attending clicks on the inbox icon, double clicks on the note marked “pending”, and opens it.
6.       The attending clicks on the “modify” icon, adds the attending note, and then signs the note.
7.       The note is still attributed to the resident and contains the attending’s note and electronic signature as an addendum.
If you find a better way let everybody know.
Jay H. Mayefsky, M.D., M.P.H.
Professor of Pediatrics and Preventive and Family Medicine

Tuesday, December 7, 2010

Inserting one PowerNote template into another (Dr. Barker)

.It is possible to utilize one PowerNote template inside another – typically this occurs because you are using one of your customized PreCompleted notes and you realize that the patient has a specific complaint that could be more easily documented using an available PowerNote designed for that complaint.  Here is how you insert one note into another.

Here I have opened the HIV Outpatient note and started to work with it when I realize that this patient really has abdominal pain as their primary problem.
Go to “Documentation” click on it and choose “Encounter Pathway" 


In the resulting Popup I type Abdominal Pain and I pick the middle one, and click OK in the right lower corner


Now what I get is a combination of the note type I started with and most of the components of the abdominal pain note inserted into my original note.   Many of these are very useful for documenting this specific type of complaint


Monday, December 6, 2010

PowerNote Guide (Cerner)

PowerNote Guide (Cerner)

Diagnosis and Plan (Repeat) – huh? (Dr. Barker)

 
Down at the bottom of most PowerNotes is the least understood section of all – and probably the most important.

 
Why do we need to break up diagnoses this way?  It has to do with Medicare.  Under Medicare rules each order for an outpatient has to be tied to a specific diagnosis.  This design is set up to encourage us make clear why we ordered something.  Once you figure it out – it can be fairly easy. 


First the (Repeat) – this is here so you can add more sections if you need them – for a patient that has more than one diagnosis.  For many notes that are specific to a disease there is already one paragraph at the top that lists a diagnosis or several diagnoses possibly relevant to the complaint.  Then you can repeat as many paragraphs as you need.  To get a new Paragraph – right click the word (Repeat) and drag down and click on Repeat in the drop down. 


The other key piece of info to have here is that benign looking first statement
"OTHER DIAGNOSIS" – click it


You will get this:


Conceptually this box had two parts – the bottom part is the Problem List and the top part is the Diagnosis list.  What it wants you to do is select those problems that you are addressing on this visit, put them in the top Diagnosis box, and then say include them in separate paragraphs of the note.   There are several ways you can do this.  1. you can click on a problem in the bottom box and holding the left mouse button down drag it to the upper box.   2. you can right click on a problem in the lower box and click “Add to diagnosis.    


You can also modify your problem list from the bottom box by right-clicking the bottom box and clicking Add Problem


This takes you here where you can look up new problems and add them to the problem list and if you want the diagnosis list at the same time.  


Now to address this diagnosis you click on just one diagnosis – for this paragraph and then click on the “Include” button. 


You will get this: 


Now you can click off whether it is getting better or worse – another billing thing, and what you intend to do about it


The other thing in here is the spot that says PowerOrders.  


If you click on this you open the Orders window – in 2011 we will start using this to prescribe meds for outpatients and hopefully place our lab orders electronically.  


And anything I order this way gets tied to that diagnosis to keep Medicare happy and is documented as part of my plan under that diagnosis 


If you are tackling additional diagnoses, click the next one in the top box and include it in another paragraph and repeat until you have documented all the ones you addressed.  Remember the ability to re-use and Existing note?  It could allow you to do this once and benefit on a bunch of complex subsequent visits.

So – OTHER DIAGNOSES lets you hunt through Problem list for things you want to manage on this visit (or you can add new ones to your problem list and diagnosis list).  Generally you want to put one Diagnosis per paragraph – (Repeat) ing as many extra paragraphs as you need.  This is a fairly easy way to document how you are addressing each problem.  Soon you will be able to order meds and labs for outpatients through this – as you already can for inpatients – invoking PowerOrders from a PowerNote lets you go right back to your note as soon as you are finished ordering.


One thing to keep in mind – Medicare does not expect you to be perfectly correct about your diagnoses.  You can reinforce this by clicking on some of the choices in the Add Problem box like “possible” or “differential”, or using the Comments box on the right side.   For example Medicare will not pay for a PSA as a screening test but if you say the patient has possible Prostate CA as a differential for his BPH symptoms they will


Using an Existing Note (Dr. Barker)

Even better than using a PreCompleted note is re-using a prior note on this patient as the basis for the current note.  All the diagnosis stuff at the bottom is already there and frequently PE just needs updating. 

The second tab when you Add a note is “Existing”, click and you will see prior PowerNotes on this patient.  Using the check boxes you can filter the list when it gets long by looking only at your notes.   Generally you want to have “All encounters” checked for outpatients, “Current encounter” might make sense for inpatients. 


  Pick the note you want to use and then click OK.


  When you import a note this way it frequently comes into view in the “Display Note View”.  To change it so you can work on it click on the button in the upper right that says “Template View."


Couple of things to be mindful of – it has a tendency to include the vital signs of the original note and the current visit.  Click on and then “clear” the old ones if you want.   You may need to update the medication list – and sometimes it imports things like meds, allergies, and dx twice (old note and new AutoPopulate) doubleclick or right click and clear to get rid of older one. 

 You will need to add any new diagnoses and delete any you are not addressing at this visit in the diagnosis and management section.  Also remember to clear any physical, lab, or consult info that is not longer relevant.  But for many routine outpatient visits, and probably many inpatient days the last note might be a good place to start from for today’s note 

Thursday, December 2, 2010

Pre-Completed Note (Dr. Barker)


PowerNotes allow you to take a PowerNote and use it as a template for your typical patient visits.  So lets say I want to have an outpatient note for seeing patients with osteomyelitis in I.D. Clinic.

I start off by changing Type to Infectious Diseases Outpt, I want to see if there is a note type that can be useful so using the encounter pathway I type “osteo” and I find out there is a pediatric osteomyelitis note. 


I can go through this entire note filling in all the bits that are likely to be correct – like most of these come to clinic from nursing homes where they are getting IV antibiotics (using my AutoText).


Once I have it completed it I go up to the “Documentation” tab at the top – click on it and then select “Save As Precompleted Note” 


Next screen asks me to name it – lets call it “Osteo in I.D. Clinic”  And click on the “save as new” button. 


These new “Precompleted Notes” are accessible under your tab of the same name when you go to add a note. 


So what does this get you – you could create a whole bunch of personalized templates where large sections of the note can be completed ahead of time.  For example most of us do the same elements of physical exam for each asymptomatic outpatient we see you can check off all the physical exam elements as normal and then just alter any you find are abnormal.  Typical visit is one such note for me – this is the PE section.  Anything I skip I just uncheck, anything abnormal I just change – but all the normals are all ready checked off. 


You can do the same thing for lots of different common conditions, and procedure notes.  This can be a big time saver – just remember not to use it to document things you did not do. 

So if you are making a Precompleted note you want it to be somewhat generic, but specific for your exam, your patient education, etc. 

Auto Text (Dr. Barker)


We have lots of templates built up in Cerner clinical notes, but getting them modified is time consuming and rarely anyone’s top priority.  Using AutoText you can make modifications to templates and you can make them more useful.

This time lets start off in the clinical documents – the old way we have been doing documents.  By the way if you are nervous, there are quite a number of bogus patients named Test, Test etc. that you can work on and not harm. 


Open up a new note, and import your favorite template as you usually do.
Mine is the template for recording HIV resistance tests.


Now, lets fix a few things, take out the empty space at the top, fix the misspellings, add a couple colleagues names at the bottom, etc.  Just bring it up to date. 

Next step is to use a Cerner trick – there are a whole bunch of places in this form where we need to enter information but this is just plain text as far as Cerner is concerned.  We can tell the Cerner System where those places are by using the UNDERSCORE character.  To insert an underscore you place your cursor where you want and while holding the SHIFT key down you hit the key just left of the + and = sign key, this inserts an underscore.  Cerner understands that an Underscore is where you want to enter data.   So the best practice is to go to each place in a form and leaving one blank space after the : place a ­_ symbol.

So my form now looks like this.


Cerner uses the F3 key at the top left of the keyboard as a TAB key to move between underscores in a document.   Hitting the F3 moves you right to the next underscore

So how does this tie into AutoText – simple; remember the thing about placing the cursor in front of text and holding down the left mouse key – and dragging it through the whole text you want to use?  Do it now and highlight the whole modified template.   Whole thing should be highlighted in black


Now right click the text and pick Save As Auto Text. 


Follow the same steps and create an Auto Text , name it “zzSomething” , click Create, click Close.

Now the next time you need the template, instead of using the old template through the “rubber stamp” icon you can use your updated AutoText.  Just start a new document and either type “zz” or right click the blank field and click insert Auto Text and pick the one you want and click it. 


As a result you get your newly updated, personalized template with the nifty F3 accessible info entry places


Other very handy uses for the Underscore might be places where you want
Yes ­_  No _  N/A _  and such answers.   Just keep in mind that this is just text and in the final note you would see it as.  

Yes _  No  X   N/A _ 

This is not as good as a true PowerNote because the info is just text and cannot be searched the way the <elements> in the Sentences of a PowerNote can be.  However a really good template can make your work go faster and allows you to develop something that can later be translated into a PowerNote by an HIS analyst.   Plus you can invoke a template built as an Auto Text in a Clinical Document or a PowerNote very easily.   Your AutoTexts are available to you in both types of documents, so you can develop it in one and use it in both types.

PowerNote Conversion

  • A final reminder to all providers to schedule a training this week if you have not yet accomplished this! Information about available sessions is on the Intranet.
  •  There will be Cerner “ace support” staff located in the hospital, many of the outlying clinics, Fantus and each module in SCC every day next week.  Please take advantage of their presence to answer your questions.
  •  A 24 hour hotline will be available to troubleshoot starting tomorrow 12/1.  The number is 864-DOCS (3627).
  •  A powernote support center will open tomorrow in room 700 in the Administration building.  It will be open from 7am to 5 pm Wednesday and Thursday and 12 to 4 this Friday.  This will also be open over the next couple weeks with the schedule to be announced.   This is available to any provider seeking support in the creation of their pre-completed notes, macros etc.
  •  The following is a link to another convenient resource the youtube videos created by Dr. Bala Hota reviewing the use of the powernote.  http://www.youtube.com/user/balahota1?feature=mhsn#g/a